Getting Started Guide
Introduction
What is Basebot?
Basebot is a suite of tools for building and managing virtual assistants (AKA chatbots).
This guide will walk you through creating a simple chatbot that can tell you the weather for a given location and deploy it to Azure.
Pre-requisites
Installing NodeJS
Make sure you've got NodeJS installed. (Install here).
Test you have node installed with node -v
          node -v
          v10.16.0
Installing the Azure CLI
Make sure you have the Azure CLI tool installed (Install here).
Note: We'll be using the bash version of the Azure CLI for this guide.
Login to the CLI with az login
          az login
          Note, we have launched a browser for you to login. For old experience with device code, use "az login --use-device-code"
          You have logged in. Now let us find all the subscriptions to which you have access...
Creating a Docker account
If you wish to follow the "deploying to Azure" part of this guide, you'll need a Docker account. (Register here).
Make a note of your username - you'll need that in a second.
Setting up the Storage
We'll need credentials for a couple of services we'll be using in this guide.
With the Azure CLI tool, create a table storage account.
az storage account create -n basebot -g Basebot -l ukwest --sku Standard_LRS
Next, we need to grab the connection string for our newly created storage account.
az storage account show-connection-string -g Basebot -n basebot --table-endpoint basebot | sed -n 2p | cut -d'"' -f 4
Make a note of the string that is outputted (it should start with "DefaultEndpointsProtocol").
Adding NLP/NLU
Now we need to set up LUIS to extract intents from our user input.
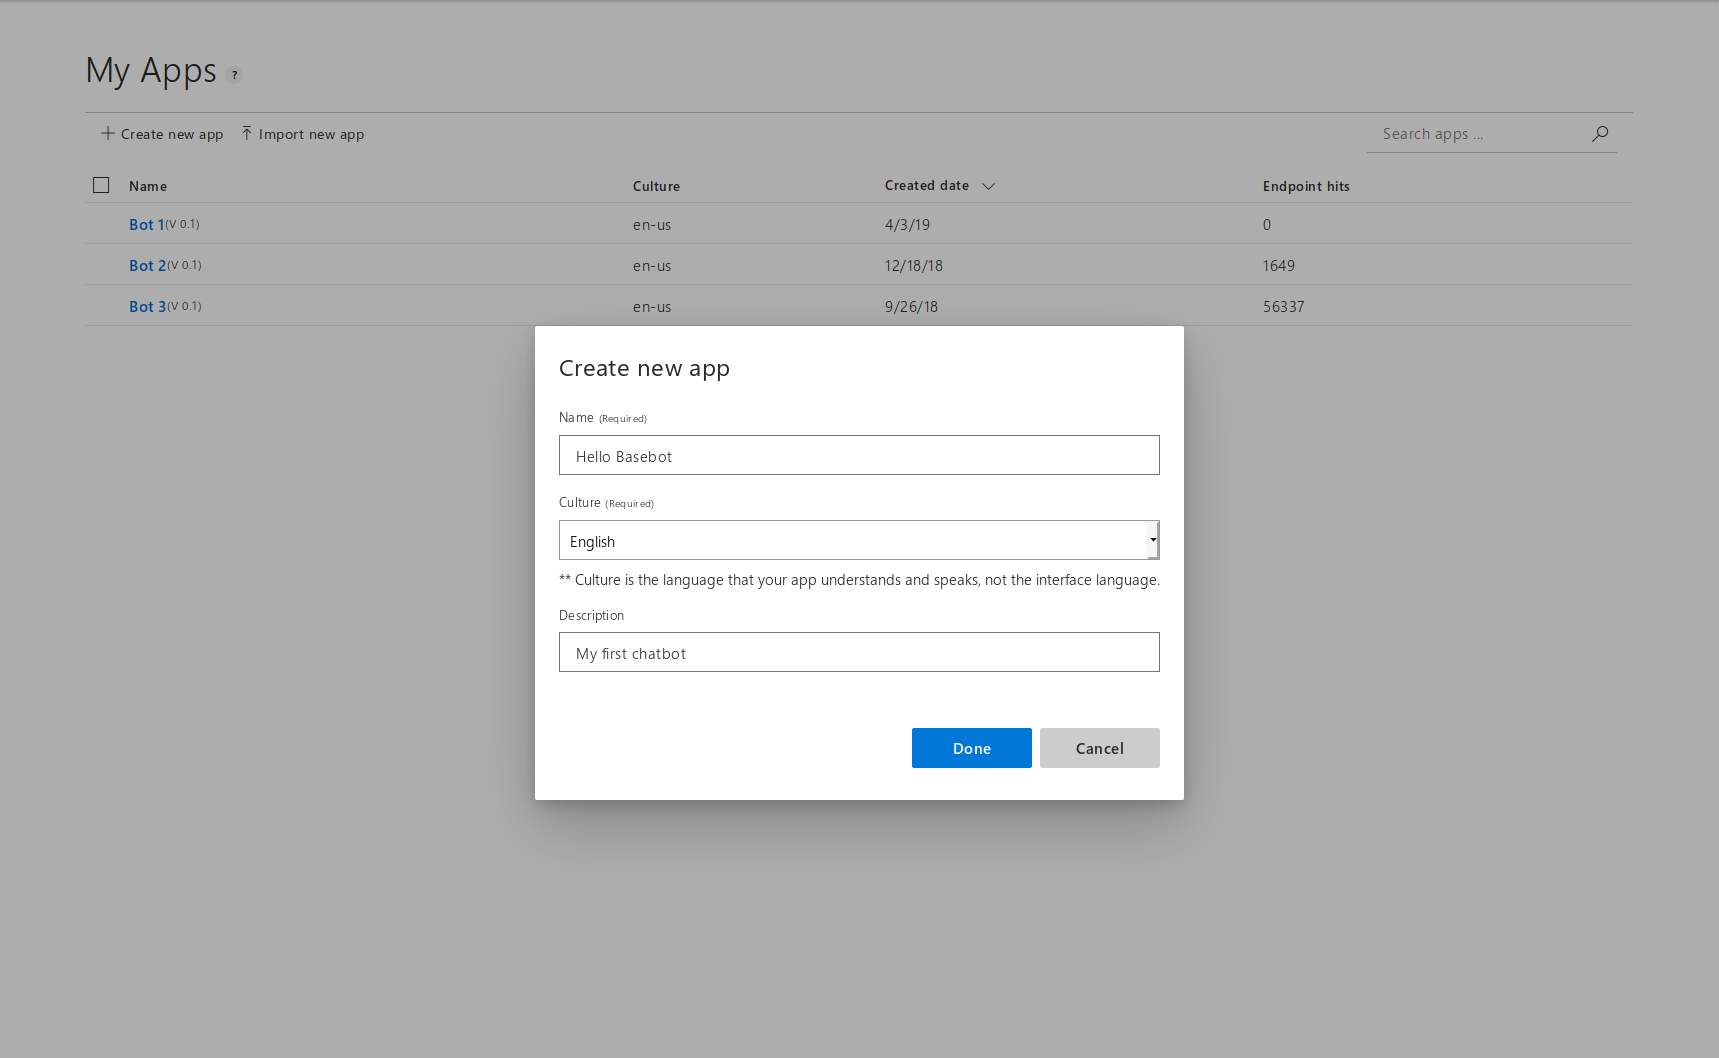
Log in/sign up at Luis.ai and create a new app.
Inside the app screen click on the Manage tab and go to Keys and Endpoints on the left.
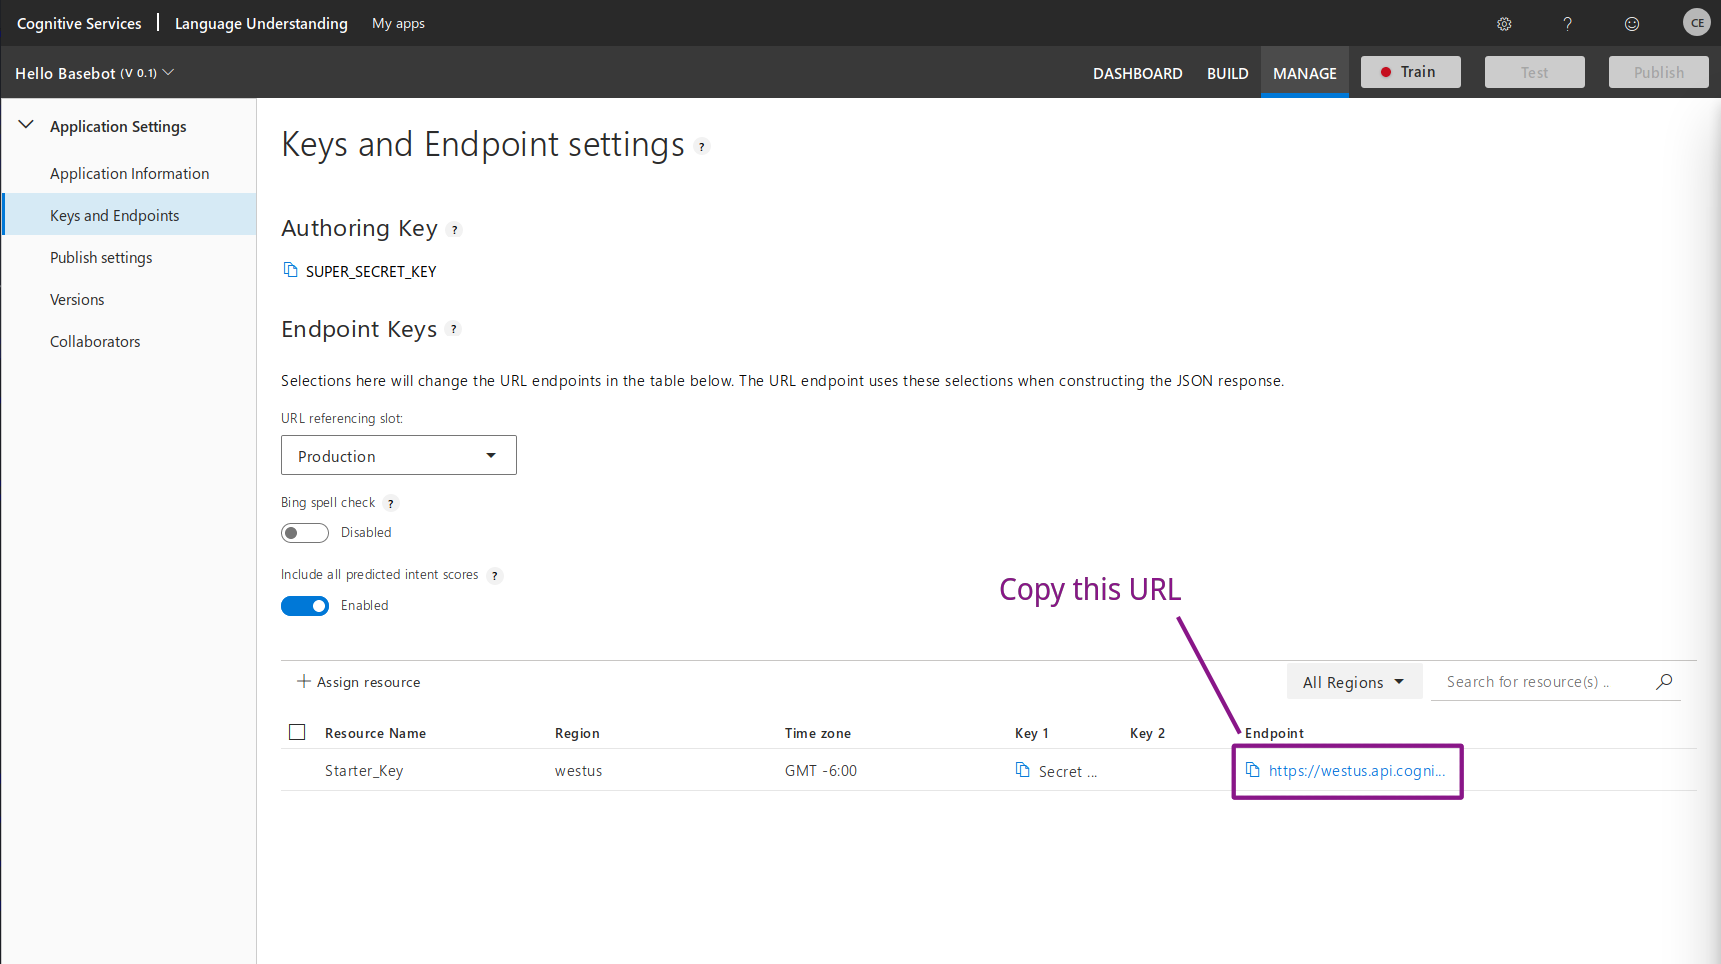
Make a note of the Endpoint URL. We'll need this later.
Creating a project
Using 'Basebot Create'
To create a new project, install the basebot CLI tool and run the basebot create
command. This will scaffold a new project in your current
directory. Enter the following when prompted:
- What is your project name? my-first-bot
- What is the name of your bot? BottyMcBotface
- How do you want people to be able to access your bot? Direct (Web, Apps etc) select with <space> and press <enter> to confirm.
- What do you want to use for storage? Azure Table Storage
- Do you wish to use an NLP service? Microsoft LUIS
- (Optional) Do you require any third party authorization support? None
- Would you like to aggregate your production logs with Papertrail? No
          npm i -g basebot-cli
          basebot create
          ? What is your project name? my-first-bot
          ? What is the name of your bot? BottyMcBotface
          ? How do you want people to be able to access your bot? Direct (Web, Apps etc)
          ? What do you want to use for storage? Azure Table Storage
          ? Do you wish to use an NLP service? Microsoft LUIS
          ? (Optional) Do you require any third party authorization support? None
          ? Would you like to aggregate your production logs with Papertrail? No
Open your newly created project in your favorite text editor. For example, with VSCode:
code my-first-bot
Configuring Environment
Open the .env file inside your project root. Add your LUIS endpoint URL and your storage connection string as shown. Also, change "YOUR_DOCKER_USERNAME" to your Docker username if you have one.
          BOT_NAME=BottyMcBotface
          USE_LT_SUBDOMAIN=my-first-bot123
          LUIS_URI="YOUR-LUIS-ENDPOINT-URL"
          DB_URL="YOUR-AZURE-TABLE-STORAGE-CONNECTION-STRING"
          DOCKER_IMAGE_NAME="YOUR_DOCKER_USERNAME/basebot-core"
To make sure everything is working, start your bot with npm run dev
          npm run dev
          > DEBUG=server* node-env-run --exec 'nodemon --exec babel-node -- ./index.js'
          [nodemon] 1.19.1
          [nodemon] to restart at any time, enter `rs`
          [nodemon] watching: *.*
          [nodemon] starting `babel-node ./index.js`

          $$$$$$$\                                $$$$$$$\             $$\
          $$  __$$\                               $$  __$$\            $$ |
          $$ |  $$ | $$$$$$\   $$$$$$$\  $$$$$$\  $$ |  $$ | $$$$$$\ $$$$$$\
          $$$$$$$\ | \____$$\ $$  _____|$$  __$$\ $$$$$$$\ |$$  __$$\_$$  _|
          $$  __$$\  $$$$$$$ |\$$$$$$\  $$$$$$$$ |$$  __$$\ $$ /  $$ | $$ |
          $$ |  $$ |$$  __$$ | \____$$\ $$   ____|$$ |  $$ |$$ |  $$ | $$ |$$\
          $$$$$$$  |\$$$$$$$ |$$$$$$$  |\$$$$$$$\ $$$$$$$  |\$$$$$$  | \$$$$  |
          \_______/  \_______|\_______/  \_______|\_______/  \______/   \____/

          ===================================================================
          |                                                                 |
          |                Your bot is available locally at:                |
          |                      http://localhost:3000                      |
          |                                                                 |
          |                          and online at:                         |
          |              https://my-first-bot123.localtunnel.me             |
          |                                                                 |
          |                      To learn more, visit:                      |
          |             https://ans-group.github.io/basebot/docs            |
          |                                                                 |
          ===================================================================
Creating a Skill
If you're joining us from the homepage check out the pre-reqs before you continue.
Registering your skill
Skills can be triggered in one of 3 ways:
- pattern: specify a pattern to look for in the utterance, either as a plain string or regex.
- intent: (requires NLP) - trigger when a specific intent name is identified
- event: respond to an in-built event or trigger a custom event manually
Let's write a skill now. First, create a file called weather.js in the skills directory.
Skill files can contain multiple skills. Open the file you just created and export an array of skill objects:
          // skills/weather.js

          export default [
            {
              pattern: ['what is the weather like?', 'weather report'],
              handler(bot, message, controller) {
                bot.reply(message, `I'm not sure (yet)`)
              }
            }
          ]
As you can see, we're looking for a pattern with the above skill. If we wanted to look for an intent or an event, we could just change that field. Currently, this skill will trigger whenever the bot hears either the phrase 'what is the weather like' or 'weather report'. Not very robust - but we'll see to that in a second 😄
The handler field is the function you want to run when your skill is triggered. In the background it leverages Botkit 0.7.4 - you can read more about the bot, message and controller objects over on the Botkit documentation.
To make sure our new skill is imported by Basebot, we just need to add an extra line to skills/index.js:
          // skills/index.js
          ...
          export { default as weather } from './weather'
Writing the handler
Let's have our bot look up the weather for a specific location. We'll start off by hardcoding this to London.
In order to do this we can use the MetaWeather API - let's install the Axios package to make this easier.
npm i --save axios
Then let's refactor our skill module to the following:
          // skills/weather.js

          import axios from 'axios'

          const weatherAPI = axios.create({
            baseURL: 'https://www.metaweather.com/api'
          })

          export default [
            {
              pattern: ['what is the weather like?', 'weather report'],
              handler: async (bot, message, controller) => {
                try {
                  // hardcode the location to london for now
                  const location = 'london'
                  // grab the weather for today
                  const { data: [{ woeid }] } = await weatherAPI.get(`/location/search?query=${location}`)
                  const { data: { consolidated_weather: [{ the_temp, weather_state_name }] } } = await weatherAPI.get(`/location/${woeid}`)
                  // reply to the message with the weather data, (notice that basebot web supports markdown)
                  bot.reply(message, `looks like **${weather_state_name}** in **${location}** with a temperature of ${the_temp.toFixed(1)}°C`)
                } catch (err) {
                  // handle any errors
                  console.error(err)
                  bot.reply(message, 'yikes! something went wrong 😟')
                }
              }
            }
          ]
As you'll notice, Basebot supports the latest JavaScript features out of the box allowing us to use async/await.
We can test this by visiting localhost:3000 in our browser and typing "weather report" to our bot.
Next, let's have our bot ask the user where they want the weather for.
          // skills/weather.js

          import axios from 'axios'
          import { promisify } from 'util'

          const weatherAPI = axios.create({
            baseURL: 'https://www.metaweather.com/api'
          })

          export default [
            {
              pattern: ['what is the weather like?', 'weather report'],
              handler: async (bot, message, controller) => {
                try {
                  // create a botkit conversation (see: https://botkit.ai/docs/v0/core.html#multi-message-conversations)
                  const convo = await promisify(bot.startConversation.bind(bot))(message)

                  // ask the user for a location (small delay for better UX)
                  const { text: location } = await new Promise(resolve => convo.ask({
                    text: 'Where would you like the weather for?',
                    delay: 1000
                  }, resolve))

                  // send an interim message with typing: true to let the user know we're working on it
                  convo.addMessage({ text: 'Checking the weather now...', typing: true })

                  const { data: [locationData] } = await weatherAPI.get(`/location/search?query=${location.toLowerCase()}`)

                  // handle invalid locations
                  if (!locationData) {
                    return bot.reply(message, `Hmm, I can't find weather for that location`)
                  }

                  // as before
                  const { woeid } = locationData
                  const { data: { consolidated_weather: [{ the_temp, weather_state_name }] } } = await weatherAPI.get(`/location/${woeid}`)

                  convo.addMessage({
                    text: `looks like **${weather_state_name}** in **${location}** with a temperature of ${the_temp.toFixed(1)}°C`,
                    delay: 1000
                  })
                  convo.next()
                } catch (err) {
                  console.error(err)
                  bot.reply(message, 'yikes! something went wrong 😟')
                }
              }
            }
          ]
Great stuff! The only thing now is that it's somewhat difficult for a user to trigger this skill. There are so many varying ways a user could ask for the weather. Wouldn't it be great if we could just give a few examples of things they might say and have some AI do the rest? That's where LUIS comes in!
Let's head back over to Luis.ai. This time we're going to go to the build tab.
We're going to use one of LUIS's built-in intents. Under the intents section, click Add prebuilt domain intent and select Weather.QueryWeather.
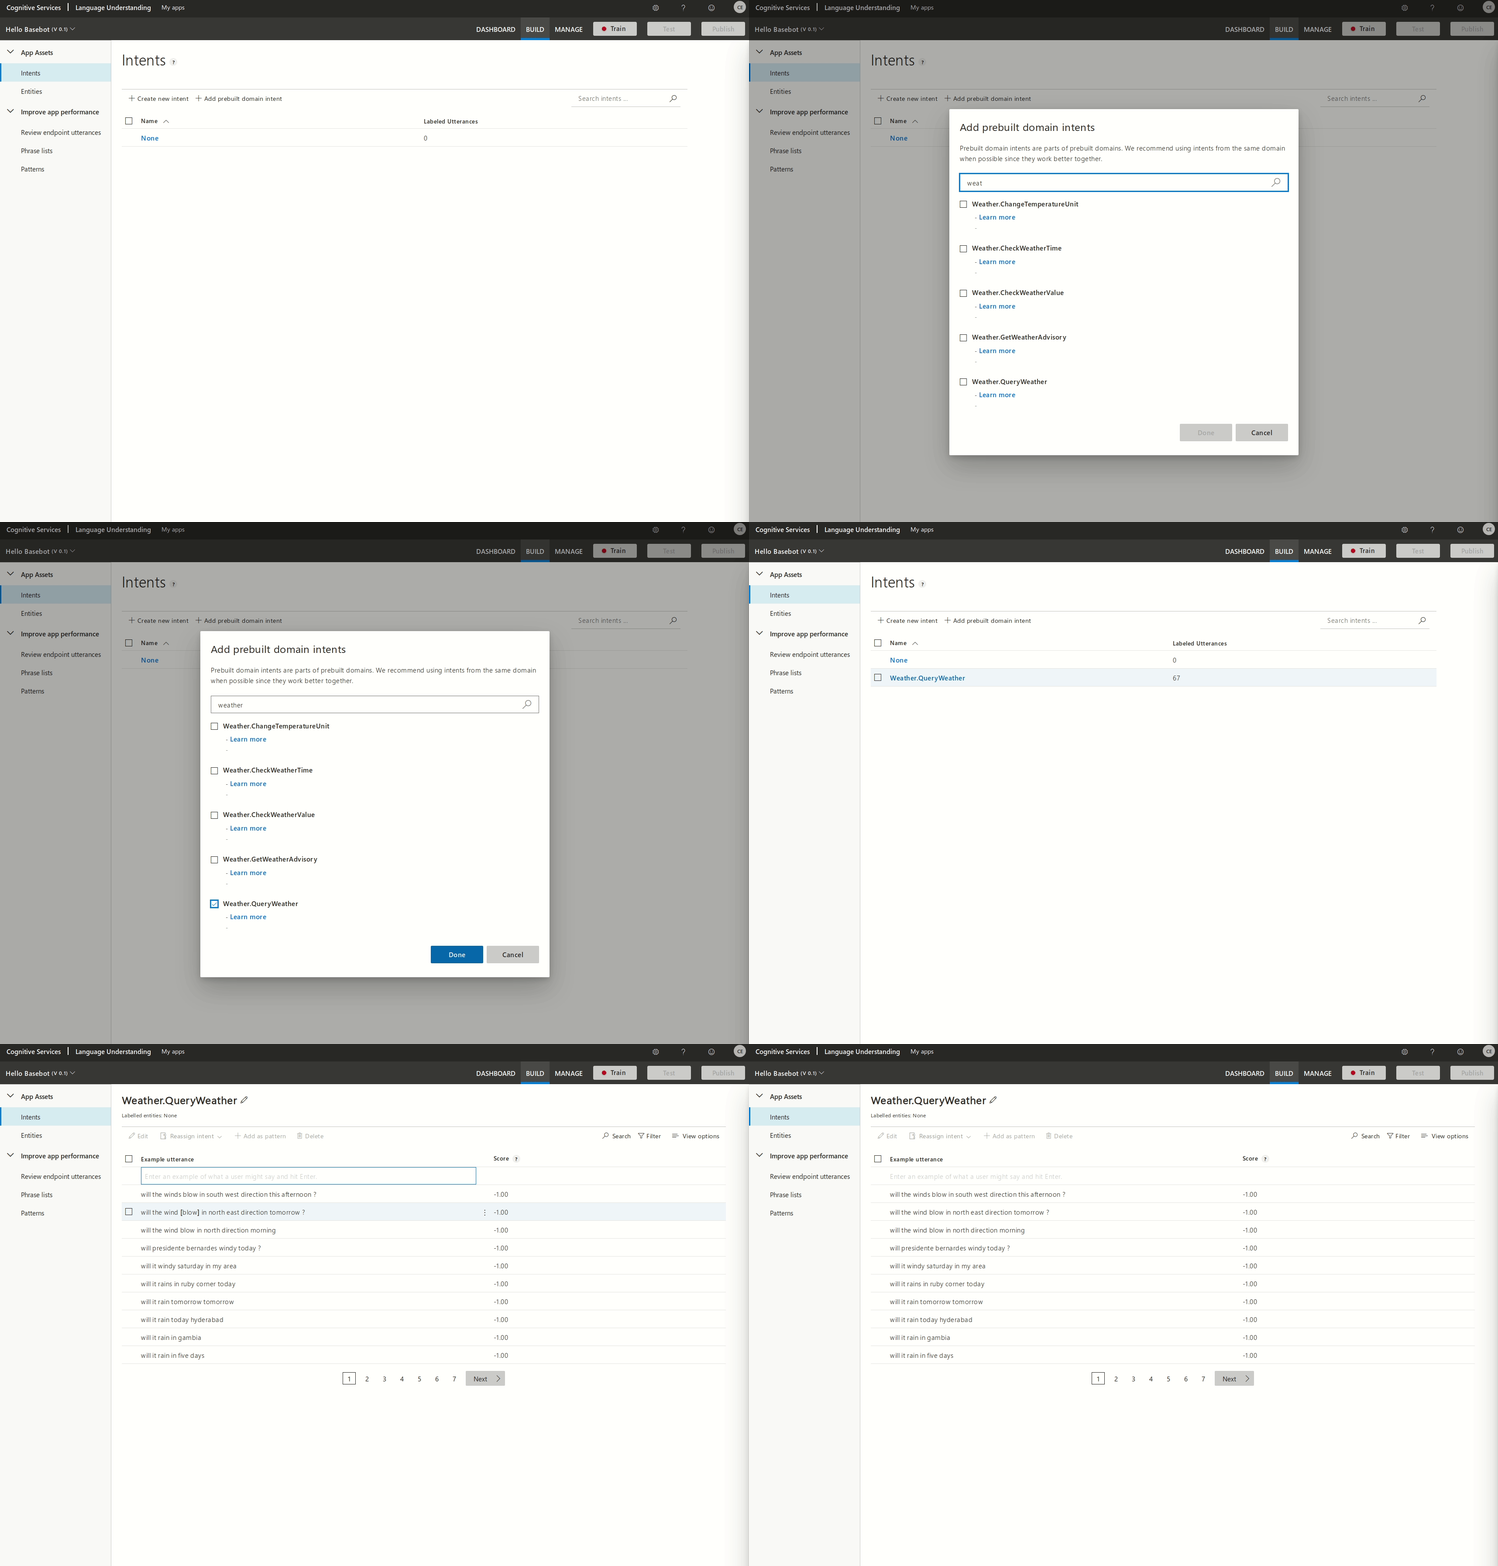
This is a prebuilt intent, but it's also really easy to add custom intents. Once you've added the weather intent we need to train and publish our model. We can do that with the buttons on the top right.
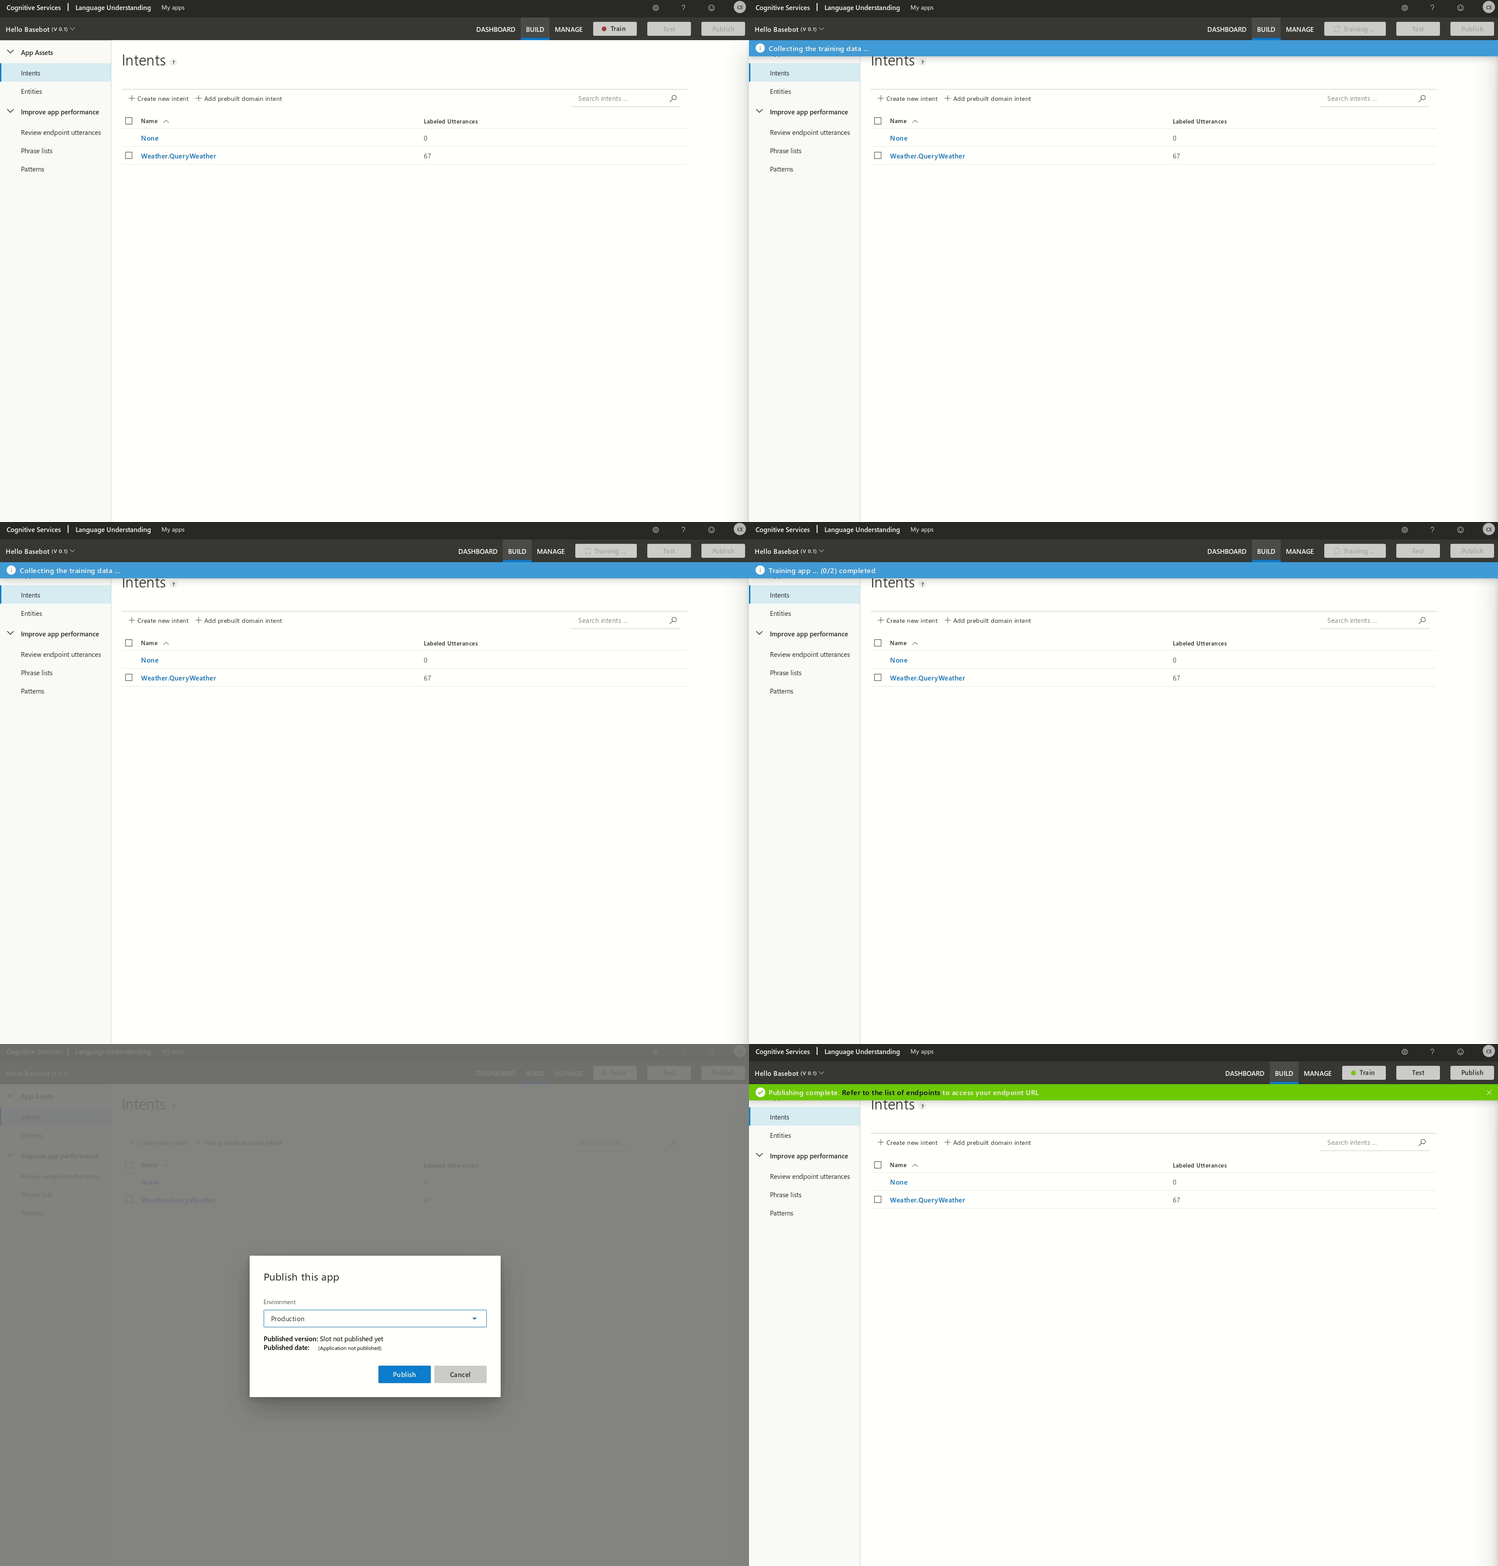
Let's change our skill to look for the Weather.QueryWeather intent.
          ...
          export default [
            {
              intent: 'Weather.QueryWeather',
              handler: async (bot, message, controller) => {
                ...
              }
            }
          ]
Testing your bot
Manually testing your bot
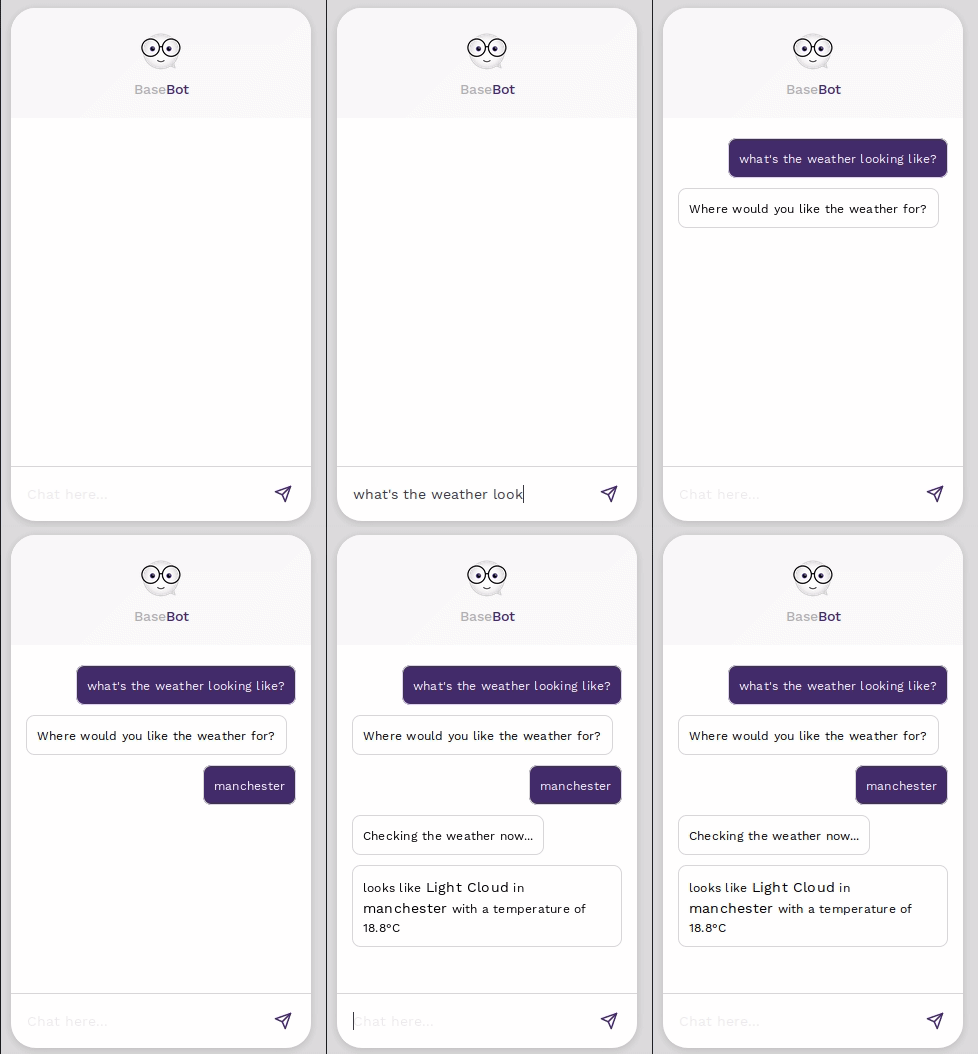
Visit localhost:3000 to chat with your bot.
Try asking it what the weather is like in as many different ways you can think of.
Writing your first test
If you run the npm test command you should see that there area already two
example unit tests (that should hopefully be passing!).
Let's write a test for our newly-created weather skill.
Create a new file at /__tests__/weather.js and add the following:
          // __tests__/weather.js

          import channels from '..'
          const { controller } = channels.test
          const { bot } = controller

          jest.setTimeout(10000)


          describe('Weather skill', function () {
            test('User can ask about the weather', done => {
              bot.usersInput(
                [
                  {
                    user: 'user123',
                    channel: 'socket',
                    type: 'message_received',
                    messages: [
                      {
                        waitAfter: 3000,
                        isAssertion: true,
                        text: 'Weather report'
                      }
                    ]
                  }
                ]
              ).then((message) => {
                expect(message).toEqual(expect.objectContaining({
                  text: expect.stringMatching(`Where would you like the weather for?`)
                }))
                done()
              })
            })

            test('User can provide location for weather report', done => {
              bot.usersInput(
                [
                  {
                    user: 'user123',
                    channel: 'socket',
                    type: 'message_received',
                    messages: [
                      {
                        waitAfter: 3000,
                        isAssertion: true,
                        text: 'London'
                      }
                    ]
                  }
                ]
              ).then((message) => {
                expect(message).toEqual(expect.objectContaining({
                  text: expect.stringMatching(`Checking the weather now...`)
                }))
                done()
              })
            })
          })
All we're doing here is writing two really simple unit tests to check that the responses are what we expect them to be. Feel free to improve these so that they cover more scenarios (e.g. invalid location).
Run all tests with the npm test command.
Deploying
Building the bot
To build the bot, just run the npm run build command. This will
bundle/transpile all of your code into the build directory and build you a docker image.
The docker image name will be whatever you set the DOCKER_IMAGE_NAME variable to in .env.
Note: You can also just run the files in /build with node build if
you don't want to use containers (make sure to set your env vars).
Deploying to Azure
First, let's push our container to Docker Hub (this will be public by default).
npm run push-docker
Next, create a container with the Azure CLI using the same image name you set previously.
          source .env && az container create \
          --resource-group Basebot \
          --name basebot-core \
          --image YOUR_DOCKER_USERNAME/basebot-core:latest \
          --dns-name-label basebot \
          --ports 80 443 3001 \
          --location uksouth \
          --restart-policy OnFailure \
          --environment-variables 'BOT_NAME'="$BOT_NAME" LUIS_URI="$LUIS_URI" DB_URL="$DB_URL"
Once that completes, you can check the status using:
container show --resource-group Baesbot --name basebot-core --query "{FQDN:ipAddress.fqdn,ProvisioningState:provisioningState}" --out table
If the ProvisioningState is "Succeeded" then your container instance is up. If not, wait a minute and try again.
Once you see "Succeeded" copy the FQDN URL (it will be something like basebot.uksouth.azurecontainer.io).
You can speak to your bot via this URL on port 3001 through a websocket, but for now, let's just use the local
version. Run npm run dev again in your project root and visit
localhost:3000 in your browser. Change the endpoint URL to (your FQDN URL):3001 - e.g.
basebot.uksouth.azurecontainer.io:3001
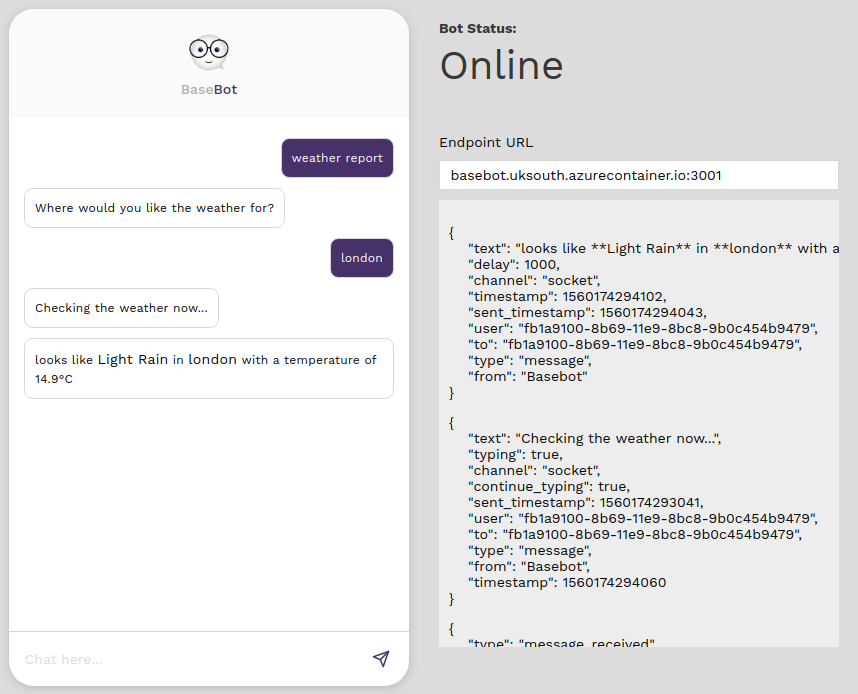
Wait a second for it to connect and then try it out. If it responds, congratulations! You've just successfully deployed your bot!
Next Steps
Next, why not write some more skills. Or explore the rest of this documentation.
If you need any help, contact appdev@ansgroup.co.uk.
Modules
Connectors
Web Connector
The basebot-controller-web connector enables direct websocket connections from any bespoke client to Basebot.
To enable, add the following to services/channels/production.js
          import storage from '../storage'
          import logger from '../logger'
          import webBot from 'basebot-controller-web'

          const info = logger('channels', 'info')
          const error = logger('channels', 'error')

          const botOptions = { storage }

          const channels = {

            direct: {
              controller: webBot(botOptions),
              listen(controller, server) {
                server.post('/botkit/receive', function (req, res) {
                  res.status(200)
                  controller.handleWebhookPayload(req, res)
                })
                controller.openSocketServer(server)
                controller.startTicking()
                info('Web bot online')
              }
            },

          }

          export default channels
When using basebot create with the web connector, it will automatically
bundle a test chat interface which will be served at the web root (e.g. localhost:3000).
By default, the websocket will mount on port 3001 - this can be changed by passing a second argument into the controller.openSocketServer function. e.g.
          controller.openSocketServer(server, {
            port: 3005
          })
Alexa Connector
The basebot-controller-alexa connector allows you to handle Alexa input with Basebot
To enable, add the following to services/channels/production.js
          import storage from '../storage'
          import logger from '../logger'
          import alexabot from 'basebot-controller-alexa'

          const info = logger('channels', 'info')
          const error = logger('channels', 'error')

          const botOptions = { storage }

          const channels = {

            alexa: {
              controller: alexabot(botOptions),
              listen(controller) {
                const bot = controller.spawn({})
                controller.createWebhookEndpoints(controller.webserver, bot)
                controller.startTicking()
                info('Alexa bot online')
              }
            },

          }

          export default channels
You'll also need to register the middleware in services/middleware/production.js
          import { heard as alexaMiddleware } from 'basebot-controller-alexa'
          import storage from '../storage'
          import logger from '../logger'

          export default [

            {
              type: 'heard',
              handler: alexaMiddleware(storage)
            }

          ]
A couple of considerations when using the Alexa connector:
- Alexa doesn't store the utterance so pattern matching won't work. You have to match on an intent. If you specify a pattern, then the module will treat the intent name as the utterance which could cause unforeseen weirdness.
- Alexa doesn't like multiple responses. You can send 1 or 2 messages and indicate there are more coming by
adding
progressive: trueto the message object, but you won't be able to send more than 4 without an additional user input.
Slack Connector
Docs coming soon
SMS Connector (using Twilio)
Docs coming soon
Storage
MongoDB Storage
The basebot-storage-mongo storage module enables MongoDB integration.
To enable, add the following to services/storage/development.js
          import storage from 'basebot-storage-mongo'
          import logger from '../logger'

          export default storage(logger)
Required environment variables:
-
DB_URLa Mongo URL
Azure Table Storage
The basebot-storage-azuretables module enables integration with Azure Table Storage.
To enable, add the following to services/storage/development.js
          import storage from 'basebot-storage-azuretables'
          import logger from '../logger'

          export default storage(logger)
Required environment variables:
-
DB_URLan Azure Table Storage connection string
DynamoDB
The azure-storage-dynamodb storage module enables integration with AWS DynamoDB.
To enable, add the following to services/storage/development.js
                  import storage from 'basebot-storage-dynamodb'
                  import logger from '../logger'

                  export default storage(logger)
Required environment variables:
-
AWS_REGIONthe AWS region (e.g. eu-west-1) -
AWS_ACCESS_KEY_IDAWS access key ID -
AWS_SECRET_ACCESS_KEYAWS secret access key
Firestore
The basebot-storage-firestore module enables integration with Firebase's Firestore.
To enable, add the following to services/storage/development.js
          import storage from 'basebot-storage-firestore'
          import logger from '../logger'

          export default storage(logger)
Required environment variables:
-
DB_URLyour Firestore endpoint -
FIREBASEStringified service account JSON from a firebase.json.
Natural Language
LUIS (Microsoft)
The basebot-middleware-luis module allows all messages to have an intent associated with them via Microsoft LUIS
To enable, add the following to services/middleware/production.js
          import luis from 'basebot-middleware-luis'
          import logger from '../logger'

          export default [

            {
              type: 'receive',
              handler: luis(logger).receive()
            },
            {
              type: 'hear',
              triggers: ['intent'],
              handler: luis(logger).hearIntent
            },

          ]
Required environment variables:
-
LUIS_URLyour LUIS.ai endpoint URL
Enabling this module will allow you to listen for intents inside skill modules.
Lex (AWS)
The basebot-middleware-lex module allows all messages to have an intent associated with them via AWS Lex.
To enable, add the following to services/middleware/production.js
          import lex from 'basebot-middleware-lex'
          import logger from '../logger'

          export default [

            {
              type: 'receive',
              handler: lex(logger).receive
            },
            {
              type: 'heard',
              handler: lex(logger).heard
            },

          ]
Required environment variables:
-
AWS_REGIONthe AWS region (e.g. eu-west-1) -
AWS_ACCESS_KEY_IDAWS access key ID -
AWS_SECRET_ACCESS_KEYAWS secret access key
Enabling this module will allow you to listen for intents inside skill modules.
Authentication
Microsoft Authentication
The basebot-auth-microsoft module allows you to quickly authenticate users with Microsoft services (via OAuth2)
To enable, add the following to services/auth.js
          import mapValues from 'lodash/mapValues'
          import microsoft from 'basebot-auth-microsoft'
          import logger from './logger'
          import storage from './storage'
          import server from './server'

          const handlers = {
            microsoft
          }

          const authModules = mapValues(handlers, init => {
            const handler = init(logger)
            handler.registerEndpoints(server, storage)
          })

          export default authModules
Required environment variables:
-
MS_APP_IDApp ID (Azure apps) -
MS_APP_PASSWORDApp password -
MS_APP_SCOPESScopes: See here -
CRYPTR_SECRET(required in production only) - a string to use as a cipher for at-rest encryption.
Use the getAuthUrl(userId) method to generate an authorization URL for a user.